My Learjet 45 Home Cockpit (63 posts)
15/04/2012
Some design...
by Marco
After a little pause, due to no free time, finally I was able to write down some design...
It's time to think to the physical structure of the cockpit.
Taking inspiration (I'd say copying...) from the omnipresent Dave (http://www.learjet45chimera.co.uk/)
and getting help from Piero, I defined the definitive (mah!) structure of the "thing".
I used Google SketchUp for 3D modelling and designing.
This is my target:
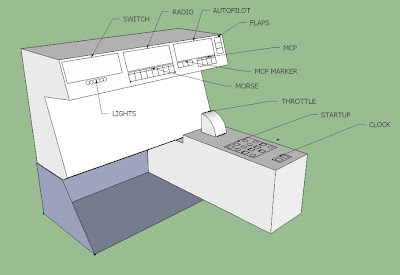
The system is made-up of two main blocks:
- the "main panel": frontal part;
- the "pedestal": the lower part of the cockpit with central tunnel;
In the main panel

there will be, in the upper part, 3 SAITEK panels:
- switch panel;
- radio panel;
- autopilot panel;
These panels contains the main commands of the sim.
- under the switch panel I'll set up leds for the lights notifications (because they miss in saitek panels);
- under the radio panel I'll set up push-buttons for the management of morse codes;
- under autopilot panel there will be a rudimental "MCP Panel" which contains the Markers (OM, MM, IM), buttons for the altimeter management, the flight director and the master caution;
- near the autopilot panel I'll set up leds for flap position, because the saitek panel lacks them;
In the lower part of main panel there will be glass cockpit; but I didn't think about it.
In the Pedestal

there will be:
- the pedals, just under the main panel;
- throttle, mixture and spoiler levers;
- the startup panel;
- the general panel;
In particular, the startup panel

and the general panel

Now I have to decided where the yoke will be placed.